

Since this is one of my most popular blog posts ever, I am re-posting it! It was originally posted back in June of 2008.

Some of you have asked about easy instructions for a beginner apron. So, here you go!
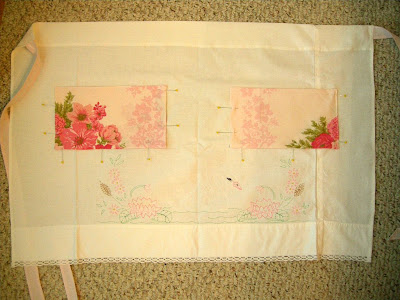
This one is made from two vintage pillowcases. They are so much fun to use because of the unique embroidery work you find on each one.
Let me know if you have any questions and I'd love to hear from you if you plan to make one, or have one completed.
Materials Needed:
1 Vintage Pillowcase
2 6"x19" pieces of fabric for pockets
2 2 1/2"x about 40" pieces of fabric for ties (can use upper portion of pillowcase)Vintage Trim - Rick Rack or Ribbon
White Thread
Sewing Machine and/or Serger
Straight Pins
Iron
Rotary Cutter and Mat
Transparent Ruler
Scissors
Instructions:
1. Press your pillowcase using your iron and spray starch.
2. Determine the length for your apron. (Mine is 21") Add 2 1/2" for the waistband. Using a rotary cutter and transparent ruler, cut across your pillowcase.
3. Determine the width of your apron. (Mine is about 33" wide) Flip your pillowcase over, and cut a slit down the middle. Lay it out flat on your cutting mat and cut to the desired width being careful to center the motif.
4. Hem the sides by serging; zig zagging; or turning under 1/4", press, turning under another 1/4", press, then stitch in place close to the folded edge.
5. At the top of your apron, turn down 2 1/2" towards the back for the waistband and press.

6. Open back out and turn under 1/4" along the raw edge. Press back down.
7. Using rotary cutter and ruler, cut 2 strips of fabric for the apron ties 2"x about 40" (twice the width of your pillowcase works great!).
8. Press under 1/4" on the 2 long sides and 1 short side of each apron tie. Press under another 1/4" on the 2 long sides.

9. To avoid bulky tips on the apron ties, fold the material back out and trim the corners. Fold the short end to make a pointed tip and press. Stitch around the apron ties close to the folded edge.
10. Insert ties into the sides of waistband. Pin in place. Stitch all the way around close to the folded edge.


The basics are done - now it's time to embellish!
11. Cut 2 pieces of fabric 6"x19" for pockets. Fold with right sides together and press. Stitch around with 1/4" seam allowance - Be sure to leave about 2" opening (to turn right side out).
12. Trim the corners and turn right side out. Press well. Stitch opening closed.

13. Pin pockets in place. Stitch around 3 sides close to edge.
14. To create smaller pocket sections, stitch down the center of each pocket.
15. Add desired trim along the bottom using a straight stitch.
Congratulations! You're done!
Let me know if you have any questions- I'd love to hear from you once you complete your apron.

Don't forget to visit Whoopsie Daisies on Etsy for other cool gifts and accessories for you vintage lifestyle! You can also find Whoopsie Daisies on Facebook, Twitter, and Whoopsie Daisies Days blog.
10 comments:
Love it. I will be trying this for sure.
Love this one! As soon as I finish some of my other projects, I want to try this.
Thanks!
Amanda
You are going to laugh! I jsut picked up my first apron pattern!!
I have never done one and I got a soo easy one-I hope! I will have to try this one to!
That's great Lacie! Let me know how it goes -
Hi there. I saw your post over an Apronista and came to check out the tut. It's wonderful. Now I can put my vintage pillowcases to good use! Thanks for much for sharing
christy
glad to hear it - I'd love to hear how your aprons turn out!
let me know if you have any questions.
So cute! I am pulling out my sewing machine and am going to make two of pillow case aprons today. I have so many pillow cases that I will never use on pillows again. I can't wait to get started! Thanks a bunch for posting this! It truly inspired me!
Such a cute apron!
I'm just getting interested in sewing- can't wait to try this! Thanks!
Great apron! Thanks for the how-to
Post a Comment