Saturday, October 30, 2010

Birthday Gift in 1 Hour - whew! Just in time.

We came home this afternoon from 2 ball games and I had 90 minutes until my daughter needed to be at a birthday party.   Being a procrastinator, I didn't have a gift ready - figured I'd just go shopping at Whoopsie Daisies if I had too.  But I wasn't sure an 8 year old would appreciate a pumpkin?  hmmmm. ....maybe? no? OK. (it's a joke).  I was thinking that I just might have enough time to sew something up real quick while the rest of the family was taking a nap..... (did I mention that I have no voice today and a cough that sounds like a seal?  It's not pretty.)  Anyhooooo..... back to sewing...

Here's what I managed to put together in 1 Hour (and 10 minutes.... I'm honest at least)
This the felt flower pin/ponytail holder, which I just pinned to a pre-made headband that I found at Joann's one day in the dollar bin.  I bought 5 of them, thinking they would be perfect for my little flower pins.    I have to say, the felt is much, much easier to work with than regular cotton fabric - I used in as the liner on the inside of the Scribble pad too, much easier.
Then, this is the Scribble Kit - well, minus the hand embroidered "Scribble" - (I was only working with 90 minutes, remember!) - So, instead it has a big felt "E" which is the first initial of the little gift recipient.  
Then, I just used a paint pen to write her name and a Happy Birthday message on the bag, tied it with some fabric strips, and Voila!
So, then,.... the Halloween Candy was sitting right there, and thinking I deserved a reward - I grabbed a Twizzler and sat on the couch for 10 minutes before we bolted out the door again.......


Wednesday, October 27, 2010

Hippie Bliss - Meet Me in Fort Worth!

Yesterday I introduced you to LilAnnieBel, and next up today is Hippie Bliss!

Jenn, from Hippie Bliss has created all one of a kind matchboxes and jewelry.  Her matchboxes make great hostess gifts or grown up party favors.  Take a peek at her line of jewelry, and you're sure to find something to make you smile!
Jenn is a fun, creative soul and I know you'll love browsing through her shop!
Hippie Bliss, LilAnnieBel, and Whoopsie Daisies will all be at the October Shop & See, Thursday evening in Fort Worth - click the link for more info!  (And don't worry - if you're a Rangers fan -we'll have the game on!)

Tuesday, October 26, 2010

Lil Annie Bel - Meet me in Fort Worth!

Since I think most of you have probably taken a peek inside my Whoopsie Daisies Shop, I wanted to introduce you to another Etsy vendor that I've come to love.  Crystal from Lil Annie Bel, has created some of the most beautiful soaps, lotions, and other pretties.  
I met Crystal at the Fort Worth Indie Bazaar, and was instantly impressed with the simplistic beauty of her products.

Her products are made from natural ingredients, using unique fragrances and sustainable packaging 
whenever possible.
LilAnnieBel will be at the October Shop & See Trunk Show along with myself and Jenn from Hippie Bliss.  
Click the link for more info - and come on out Thursday!

Monday, October 25, 2010

Are You Thinking Thanksgiving Yet?

Thanksgiving is exactly 1 month away - I can't believe it.  I'm stressed already, just thinking about it.  Because once Thanksgiving hits - you know what, is right around the corner - and I NEVER have enough time to plan, execute, then actually sit back and just enjoy the season.
I guess I like fall so much because we get 3 months of it - I count September, October, and November.  I don't feel so rushed.  Even though in Texas, September is still blazing hot - so it's a bit of a stretch.  But, at least I know cooler temperatures are around the corner.  (Supposed to get up to 90 today!!!  What????!  - Ugh - and here I was thinking I needed a Pumpkin Spice Latte (go here to see my hil-ar-eeee-ass friend "Charles") today - boo!!)
Oh well -

I've been playing around in my fall fabrics, getting ready for another awesome Trunk Show - October Shop & See at my dear friend Jenn's (from Hippie Bliss) house in Fort Worth, on Thursday night, the 28th.
I just can't let that 1970s fabric go!  I love it!  (See, barely a mention when I first found it hiding out in a thrift store in Indiana, but it's one of my favorites, ever!) I've saved every little bitty scrap, thinking I may be able to use it in some project later....  I know it's not for everyone, maybe it's the 1970's born child that I am that makes it feel so familiar to me.  I'm betting that my mother had me dressed in a jumpsuit for elementary school in a fabric similar to this one!
How about you?  Do fabrics take you back to a time in your life?  Or a person perhaps?
So, anywhooo..... whipped up this garland/banner/bunting thingy to hang over the fireplace.  These suckers are verra difficult to photograph, I might add!
I'll have it at the Trunk Show - along with all sorts of goodie, goodies!  If you live near Fort Worth, would love to see ya!!

Wednesday, October 13, 2010

Newest Sponsor of Vintage Indie


In my effort to streamline my marketing, and hopefully take this little venture of mine to a new level, I've decided to try sinking some money into advertising.  Instead of paying big booth fees at "craft" shows where I'm competing with everything from cosmetics to candles, jewelry and stuffed animals, all made in a foreign country - I'm going to focus on those of you who actually appreciate handmade, appreciate vintage, antiques, retro, flea markets and other people's "Funky Junk"!  I love it - and I think you do to!  So - my goal is to find more of you out there!  Because, let's face it - I'm going to keep sewing, and my sewing room/dining room is getting quite loaded (has been...for, ummm....too long to say).  Some day, I'd like to have an actual meal on that table!

I came across Vintage Indie awhile back and just loved her take on "all things vintage, in a modern life". Vintage Indie is about bringing back and appreciating things that were once discarded and appreciating them in our lives today.  Vintage Indie is also about supporting the individual business owner.  I encourage you to visit her blog - I think you'll love it.
And....let me know what you think of my sweet little advertising logo on the side.  I spent an entire afternoon creating that silly thing - I can now say with confidence that I can create a 150x200 logo!

Yesterday, Whoopsie Daisies, was featured as the headline sponsor at Vintage Indie.  I love how the post looks, and the new look to the photographs!

So - do you visit any good "vintage" blogs?  What are your favorites??  Some of mine are listed on my sidebar (along with a menagerie of other fun stops).

Sunday, October 10, 2010

Pretty Vintage Pillowcase Turns Cafe Apron - A Free Tutorial - Super Easy!


Since this is one of my most popular blog posts ever, I am re-posting it!  It was originally posted back in June of 2008.  

DSCN2911
Some of you have asked about easy instructions for a beginner apron. So, here you go!
This one is made from two vintage pillowcases. They are so much fun to use because of the unique embroidery work you find on each one.
Let me know if you have any questions and I'd love to hear from you if you plan to make one, or have one completed.  

Materials Needed:
1 Vintage Pillowcase
2 6"x19" pieces of fabric for pockets
2 2 1/2"x about 40" pieces of fabric for ties (can use upper portion of pillowcase)Vintage Trim - Rick Rack or Ribbon
White Thread
Sewing Machine and/or Serger
Straight Pins
Iron
Rotary Cutter and Mat
Transparent Ruler
Scissors

Instructions:
1. Press your pillowcase using your iron and spray starch.
2. Determine the length for your apron. (Mine is 21") Add 2 1/2" for the waistband. Using a rotary cutter       and transparent ruler, cut across your pillowcase.
3. Determine the width of your apron. (Mine is about 33" wide) Flip your pillowcase over, and cut a slit down the middle. Lay it out flat on your cutting mat and cut to the desired width being careful to center the motif.
4. Hem the sides by serging; zig zagging; or turning under 1/4", press, turning under another 1/4", press, then stitch in place close to the folded edge.
5. At the top of your apron, turn down 2 1/2" towards the back for the waistband and press.


6. Open back out and turn under 1/4" along the raw edge. Press back down.
7. Using rotary cutter and ruler, cut 2 strips of fabric for the apron ties 2"x about 40" (twice the width of your pillowcase works great!).
8. Press under 1/4" on the 2 long sides and 1 short side of each apron tie. Press under another 1/4" on the 2 long sides.

9. To avoid bulky tips on the apron ties, fold the material back out and trim the corners. Fold the short end to make a pointed tip and press. Stitch around the apron ties close to the folded edge.

10. Insert ties into the sides of waistband. Pin in place. Stitch all the way around close to the folded edge.

The basics are done - now it's time to embellish!

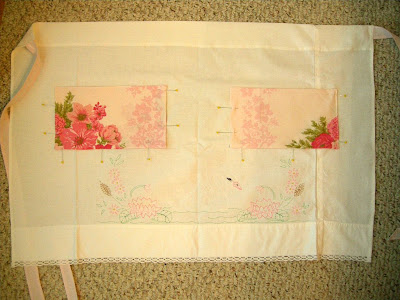
11. Cut 2 pieces of fabric 6"x19" for pockets. Fold with right sides together and press. Stitch around with 1/4" seam allowance - Be sure to leave about 2" opening (to turn right side out).

12. Trim the corners and turn right side out. Press well. Stitch opening closed.

13. Pin pockets in place. Stitch around 3 sides close to edge.
14. To create smaller pocket sections, stitch down the center of each pocket.
15. Add desired trim along the bottom using a straight stitch.

Congratulations! You're done!

Let me know if you have any questions- I'd love to hear from you once you complete your apron.


Don't forget to visit Whoopsie Daisies on Etsy for other cool gifts and accessories for you vintage lifestyle!  You can also find Whoopsie Daisies on Facebook, Twitter, and Whoopsie Daisies Days blog.


Tuesday, October 5, 2010

Pumpkin Scotchies - The Cookie Recipe

Well, after mixed reviews at my house (was I going for a crunchy cookie - and these are more like Pumpkin Bread Cookies - a softer consistency), I decided to take these to the Fort Worth Arts Goggle Saturday night as my contribution to the snack table.  (Pumpkin Spice Cookies also came along....maybe I'll post that recipe too a little later).
These little Pumpkin Scotchies were snatched up pretty quickly, with audible "Mmmmm's..... and Oooh's....) - so, here is the recipe:

Pumpkin Oatmeal Scotchies 
(From Mommys Kitchen - a great blog for everyday cooking)

1 1/4 cp all purpose flour
1 tsp baking soda
1/2 tsp salt
1/2 tsp cinnamon
1 cp butter, softened
3/4 cp. sugar
3/4 cp. brown sugar (I used dark brown sugar)
2 large eggs
1 cp canned pumpkin (I used a small can)
1 1/2 tsp vanilla extract (I used Mexican vanilla - yumm!)
3 cps quick oats
1 package Butterscotch chips

Preheat oven to 375 degrees.  Combine flour, baking soda, salt and cinnamon in small bowl. Beat butter, sugars, eggs, pumpkin and vanilla in large mixer bowl.  Gradually beat in the flour mixture.  Stir in oats and butterscotch chips.  Drop by rounded tablespoon onto ungreased baking sheet.  Bake 7-8 minutes for chewy cookies or 9-10 minutes for crisp cookies (I baked for 12 minutes and still got chewy cookies).  Cool on baking sheet for 2 minutes - then remove to wire rack to cool completely.  (Personally - I inhaled my fair share while still warm! - yumm!)


Hope you enjoy them!  Would love to hear how yours turn out!
Related Posts Plugin for WordPress, Blogger...